

Overview
This guide shows how to configure a Ubiquiti Networks managed controller in order to integrate access points with SpotOn.
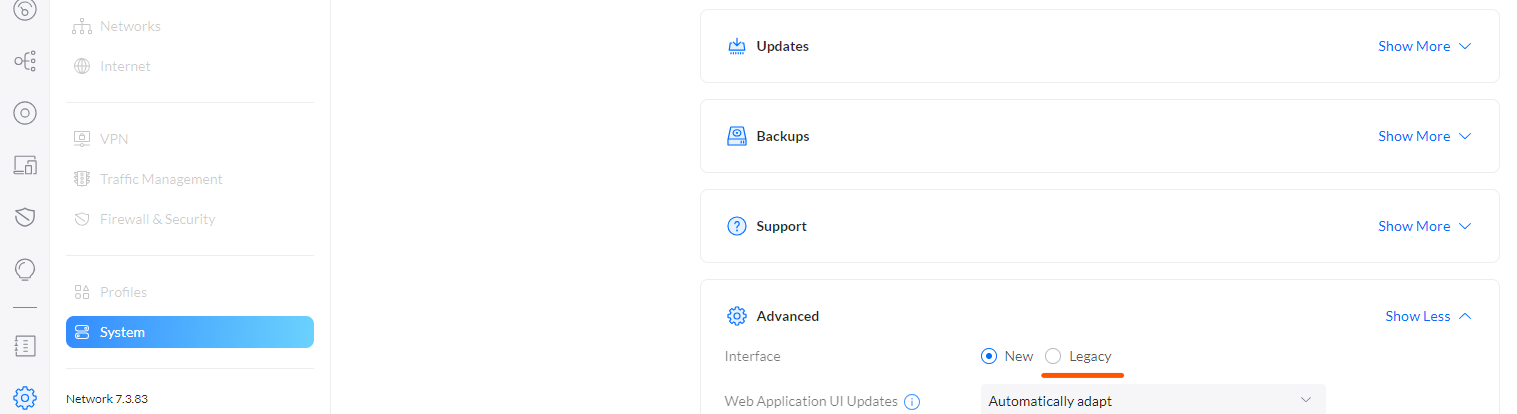
This guide uses screenshots from the legacy controller UI. When using the newest UniFi controller version most settings will be located elsewhere. We suggest using the legacy UI for setting up SpotOn. This can be done by going to Settings => System => Advanced => Interface and selecting Legacy:
Prerequisites
This article applies to Ubiquiti Unifi Network Application versions 5.x, 6.x and 7.x till 7.3.83. It is required to work with these versions to be fully compatible with SpotOn. Unifi Network Application version 7.4 and higher have some bugs due to which captive portals do not work correctly, so do not upgrade to version 7.4. If you have already done so please downgrade to v7.3.
For Ubiquiti UniFi deployments to work with SpotOn’s Ubiquiti integration the following is required:
Because the UniFi controller initially serves the portal and redirects to SpotOn’s servers, the UniFi controller must be running at all time. For a Cloud Key or server this is normal. If you use the Windows or Mac desktop UniFi version on a normal computer, it is important this computer is always turned on and running UniFi. If you shut down the computer running the controller the guest portal will NOT work!
Equally important is that the UniFi controller is reachable by the client devices on the guest network. The specific ports used for the UniFi guest portal are TCP 8880 and TCP 8843. Since the controller usually is either running on a remote location or on another network (VLAN/subnet), these ports need to be opened or forwarded in the firewall.
For a remote UniFi controller, simply forward or open the ports.
For a locally hosted UniFi controller in a different network other than the guest network, traffic from the guest network to the controller on port 8880 and 8843 needs to be allowed, as well as established/related traffic to make sure the UniFi controller can respond the client devices on the guest network.Custom portal files need to be uploaded to the controller. On Windows, Mac and Linux with a graphic interface this can be accomplished with the Explorer/Finder etc. For a cloud key or headless Linux server SSH access is required. If you use a Cloud Key, make sure you have the credentials to login to SSH. The credentials can possibly differ from the login to the controller itself. It usually is either username ubnt or root, combined with the password set on initial installation of the Cloud Key.
You may choose to configure the device to automatically receive and install last firmware updates.
You will require a RADIUS password and a Custom URL from the SpotOn Support team. Chat with us, send an e-mail ([email protected]) or give us a call (050 211 5201).
SSID setup
To set up your SSID, go to Settings > Wireless Networks and create or edit your wireless network with the following settings. Make sure to check the “Apply guest policies (captive portal, guest authentication, access)”


Hotspot configuration
Go to Settings > Guest Control.
Splash Page
Find the Guest Policies tab and configure the options as follows:
Guest Portal: check the “Enable Guest Portal” option.
Authentication: Hotspot
Redirection: uncheck all options.

Portal Customization
Find the PORTAL CUSTOMIZATION tab and set:
Template Engine: “AngularJS”
Override Default Templates: “Override templates with custom changes”

Find the Hotspot tab, check Enable RADIUS-based authorization and uncheck all the other options.

RADIUS server configuration
Scroll down to the RADIUS-tab.
To set up your SSID, click on Create new RADIUS profile and create your RADIUS server configuration.

It is necessary to check Enable accounting and Enable Interim Update, and set RADIUS Auth Server and RADIUS Accounting Server accordingly with the data specified below:
RADIUS Auth-server
IP-address: 49.13.14.122 ; Port: 1812RADIUS Accounting Server
IP-address: 49.13.14.122 ; Port: 1813RADIUS password / Shared Secret:
Ask the SpotOn team for the RADIUS password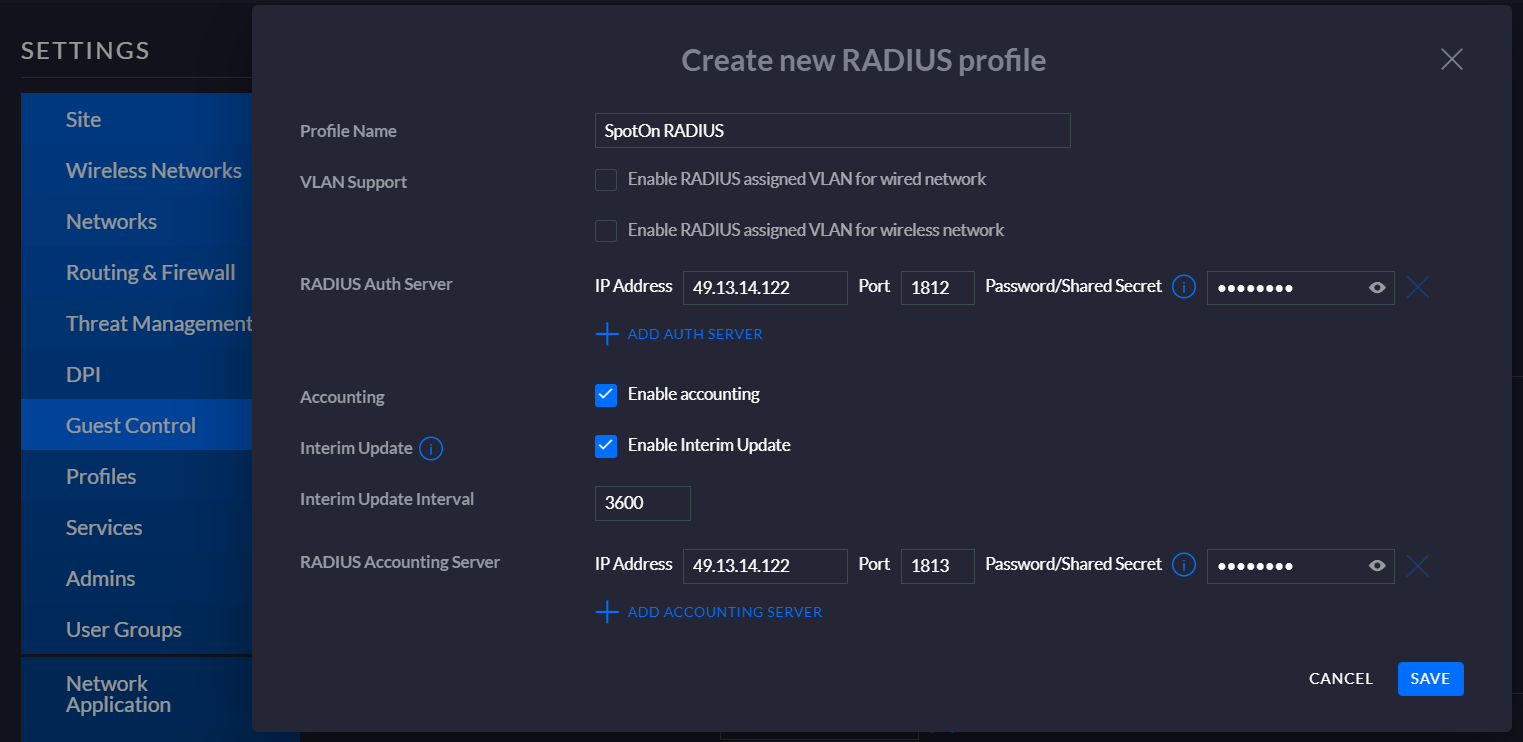
Save your new Radius Profile.
Profile: (select the profile name you set up in the previous step)
Authentication type: CHAP

Pre-Authorization Access (Walled Garden)
Under Guest Control tab go to Pre-Authorization Access section and enter the required entries.
Under Site, enable Auto-Optimize Network.

Unpack and copy the ZIP-file
In order to correctly redirect guests to our Splash Page, it is necessary to download the controller files onto the controller server.
Custom URL
Ask the SpotOn team for your custom URL.
After this step, you can extract the controller files. The destination path depends on the OS which hosts your Controller.
If your system is Linux, extract the archive to /usr/lib/unifi/data/sites/default/app-unifi-hotspot-portal
If your system is Mac, extract the archive to ~/Library/Application Support/UniFi/data/sites/default/app-unifi-hotspot-portal
If your system is Windows, extract the archive to %userprofile%\Ubiquiti UniFi\data\sites\default\app-unifi-hotspot-portal
After completion check if spoton_unifi.js contains the Custom URL to our Splash page.
*Contact the SpotOn team to recieve your Custom URL.
var spotonPortal="PLACE_CUSTOM_URL_HERE";If you are using a hosting service (e.g. Hostifi) for the controller and don't have access to the server, contact your provider to upload the necessary files in the right directory.
In case you have a Cloud Key:
Restart the Cloud Key and extract the ZIP-zip file
Download WinSCP for CK’s file system inspection, at https://winscp.net/eng/download.php
Select SFTP protocol, port 22 for configuring the file transfer.
After accessing the file system, go to /srv/unifi/data/sites/<site_name>/app-unifi-hotspot-portal (for example, in case the Default site is being used the correct path is /srv/unifi/data/sites/default/app-unifi-hotspot-portal)
Please rename the old index.html file to index.html.default before proceeding with the override and copy the extracted files there.
Ensure that the ownership of files belongs to user unifi and group unifi.